Yoshihiko Matsuo designed one car. What landed on the dealer lots in Torrance looked remarkably different from what sat in Tokyo showrooms - and if you've ever tried to research why, the answers aren't easy to pin down. Auction listings lump the market specs together with no explanation, forum threads hardly ever agree, and photos almost never tell you which country a car came from.
Whether you're piecing together a JDM build or trying to restore a car to its true factory condition, the facts do matter. A buyer needs to know which holes to fill, which lenses to track down and which bumpers to hunt for. A restorer needs to know what "factory" actually meant for that particular market. The wrong spec as your starting point costs you time and money - and with these kinds of builds, one wrong assumption tends to snowball into another.
Let's cover the main exterior differences between JDM and USDM Datsun S30s!
Table of Contents
The Bumpers That Changed the Whole Shape
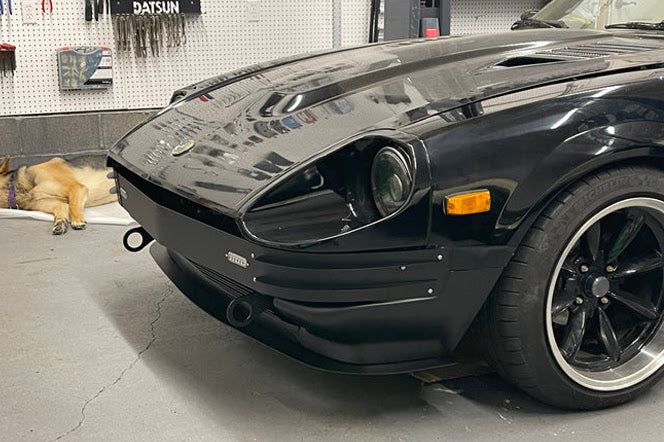
The bumpers are probably the most talked-about difference between JDM and USDM S30s and they're a great place to start if you want to get a sense of just how different these two versions of the same car actually are. The JDM Fairlady Z came with low-profile chrome bumpers that sit close to the body and leave the nose looking clean and uncluttered. The US version is a very different matter. Federal safety laws in the early 1970s made Nissan install much bigger energy-absorbing bumpers on the 260Z and the 280Z - and the end result is a front and rear end that carries far more visual weight than you'd find on a Japanese-market car.
These are not bumpers that you'd miss - not even close. The USDM units are tall, push well outward from the body and add a big heaviness to the front and rear of the car that changes how the whole shape reads. A bumper sits at the very edge of the car (right at the nose and the tail), and on the S30, that position alone makes it one of the most defining parts of the car's entire exterior. It's a single part. But its effect on the car's proportions is massive.

That's a big reason why so many owners who restore or modify USDM 260Zs and 280Zs go out of their way to track down JDM-spec bumpers. The swap pulls the car in much closer to the original Fairlady Z proportions and gives the whole body a leaner look from front to back. I'd say it's one of the best visual upgrades that you can make to a USDM car without touching anything structural. With the JDM bumpers in place, the car just carries itself differently - the USDM version, for all its looks, never quite achieves the same presence.
Why JDM Fenders Have a Cleaner Look
US federal law said that every passenger car sold in America had to have side marker lights - amber on the front fenders and red on the rear quarters. Because of this, every USDM S30 left the factory with small cutouts pressed directly into the sheet metal to fit those lenses. By law, there was no way around it.
JDM cars don't have any of that. The fenders are just smooth from front to back - no holes, no hardware, nothing at all to interrupt the body lines.

That little hole changes the way your eye travels across the fender, and once you've seen a clean JDM fender next to a USDM one, the American version starts to feel a little cluttered by comparison. The sheetmetal on a JDM car has an unbroken flow that a USDM car just doesn't have from the factory - it's the sort of detail that starts to matter more the deeper into a build you get. Plenty of builders don't think much about it in the beginning - and then at some point it ends up being the one detail that they can't stop seeing.
For owners who want that cleaner look, the fix is to fill in the marker holes and smooth out the surrounding metal. It's a pretty standard step in any build that's going for a JDM-correct appearance. The hard part is how flat and straight the panel needs to be. Bodywork punishes you for rushing it, and this particular job is no exception. A filler repair that was done too fast will give itself away the minute the light hits the panel at an angle, which is why most builders slow down and do it right.
The Two Tail Light Lens Designs
Tail lights are another area where JDM and USDM versions of the same car can look quite different. The two markets actually share a pretty similar lens shape - what changes is how each version splits up its light functions inside that lens.
The USDM tail light assembly uses one shared red section for the brake light and the turn signal. That single red lens does two jobs at once - it flashes to signal a turn and gets brighter when you hit the brakes. The JDM version works a bit differently. There's a dedicated amber section just for the turn signal, which makes the two functions more visually separate.
It's a small detail on paper. But it does change the whole character of the rear end. The amber turn section on the JDM tail light gives the assembly a more segmented and layered look - but the USDM rear stays red throughout. A reference photo of each placed side by side does make the difference pretty obvious.

It all goes back to the lighting laws that each market had in place at the time. Japan and the United States each followed their own standards for rear turn signal color, and manufacturers built their cars to meet whichever set of laws applied to the region that they were selling into. It's more of a compliance call than a design one, in other words - it's why the JDM and USDM variants like to show lens differences like this (even when the rest of the exterior, body panels, trim and everything else is practically identical between the two).
For a JDM-spec rear end on a USDM car, the taillight swap is one of the most striking visual changes that you can make. That amber section alone is enough to change the whole rear end.
Front Corner Lights and the Difference They Make
The front end is where the two specs start to diverge. USDM cars had to comply with US federal lighting standards, which pushed Nissan toward bigger and more prominent amber lens housings tucked into the bumper corners for the turn indicators and parking lights. The front face ends up with a bit more visual weight because of it, and the layout has a heavier and more grounded look all around.
JDM cars wore much smaller and cleaner units in the same area. The lenses sit more flush with the body and don't fight for your attention, which gives the rest of the front end a little more room to breathe - and on paper, it is a minor detail. But if you put the two versions side by side, the JDM nose just looks leaner and intentional. A subtler front end doesn't sound like much. But it does make for a more balanced look.

A lens housing is a pretty small part in the grand scheme of the car - it doesn't touch the hood, the fenders or the headlight buckets. Even so, a different spec can still change how the entire front end comes together. The proportions just feel different (though the sheet metal underneath is the same) - it's something quite a bit easier to see in person than to put into words.
A big part of it can depend on where your eye goes first. Bigger corner lenses pull attention outward toward the bumper edges - smaller JDM units draw your eye back toward the center of the car. That shift in visual weight changes the whole mood of the front end. You'll feel it before you can find the words for it - and once it clicks, you can't look at the front end quite the same way again.
What the Badges Say About the Market
The badges on a Z car are one of the quickest ways to work out which market it was built for, without any paperwork. Japanese-market cars wore "Fairlady Z" right on the body. American versions got the displacement-based names (240Z, 260Z or 280Z) along with Datsun branding. Each market had its own idea of what the car should be called - a disagreement that ended up literally stamped right into the sheet metal.
Badge swaps are extremely common on these cars, and you shouldn't put too much stock in what a badge tells you. A Fairlady Z badge on a USDM car doesn't make it a Japanese-market vehicle - and the reverse is equally the case. Badges are not hard to come by, are easy to remove and just as easy to replace. That makes them a decent starting point to look at a car's history. But it's not a reliable place to stop.

With that said, original badges do carry value - when they're original. More than anything, they tell you something about how the rest of the exterior has been treated over the years. A badge that matches what the car is supposed to have is a decent sign that the other exterior bits may have been left alone as well. From there, you'd want to cross-reference the rest of the car against what you'd expect to find on a correctly spec'd example.
The badges on a Z car are worth a look. But they alone won't authenticate the car - they're just one part of a much bigger picture. A car that's been rebuilt or cobbled together from multiple sources will usually show inconsistencies in a few places, and the badges are usually one of the first places where those problems turn up.
Get the JDM Look With USDM Parts
At this point, we've laid out the details about just how far the US-spec S30 strayed from what Yoshihiko Matsuo had in mind from the start. The question, of course, is what to do with that.
Some owners take it all the way. We're talking about slim JDM front and rear bumpers, filled side marker holes and every lens and badge swapped out to bring it in line with the original Japanese spec as closely as possible. It's no small commitment (in time and money), but the end result is the car just as its designer had first envisioned it.
Others land on just one or two changes - a badge swap here, a lens change there. Each strategy is a valid option, and there's nothing that says it has to be all or nothing.

The harder question is one of originality. A US-spec S30 that was delivered new to an American buyer is a part of automotive history - it's not a choice that you take lightly. With that said, there's an argument for seeing the car the way Yoshihiko actually meant it to look - without those chunky federalized bumpers and all that visual bulk they add, or the amber side markers that break up what is otherwise a clean body line.
Neither direction is wrong. What matters more is that you have a sense of what you're changing and why. The differences we've covered here are the foundation for that - and with that background behind you, you're in a much better position to make the right call for your car.
Build Your Dream Car
Whether you're chasing a clean JDM look or want to leave your USDM car just the way it rolled off the line, the story behind these differences makes it all even more satisfying to learn. None of it was random - it traces back to regulations, deadlines and engineering compromises that were made decades ago. Now those decisions are yours to use any way you want. That context makes every choice feel a little more grounded. There's something legitimately satisfying about learning why a part looks the way it does and choosing whether to keep it or replace it.
The more time you spend around these cars, the more your eye just starts to catch the small details. A bumper profile, a lens shape, a clean fender with no extra holes drilled into it - each of them tells you a little bit about where that car came from and what it's been through. That familiarity doesn't come fast - it takes time, some reading and plenty of hours around cars. For a platform as rich as the S30, that process is one of the most rewarding parts of going deep on it. The facts start to feel like a language that you actually speak.

At Skillard.com, we make custom parts for Datsun Z cars (the 240Z, 260Z and 280Z), and our catalog runs pretty deep. From bumpers and spoilers to aluminum door cards and center consoles, it's a wide range that's worth a look, no matter where your build stands at the moment. Each piece was built with these cars in mind, so the fit and the look tend to land right where you want them.
Check us out at Skillard.com to see the full lineup and find what fits your vision for the car.