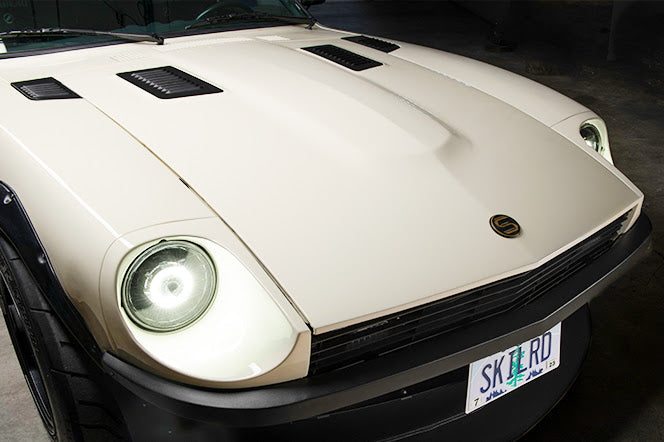
A gleaming Datsun Z just turns heads at any weekend cars-and-coffee meet. They sure don't make them like this anymore.
You only need a few basic tools to get started. To restore aluminum to its best, you should first remove the trim. Then you need to clean each piece closely.
Next, you should polish the metal closely. This is where the aluminum truly shines. Finally, you have to fix any damage you find and put everything back in place neatly.
Many of us have stared at dull beltline molding thinking if it can be saved - this restoration work makes your car authentic, helps with what you can sell it for, and gives you a real sense of pride when you're done.
The process takes some patience and close attention. Every little bit matters. Say you've noticed how much shine your classic car has been missing this time. With your tools ready and a picture of what you want to accomplish, it's time for you to roll up your sleeves and remove those aluminum pieces without adding more wear to decades of history.
Table of Contents
Safe Trim Removal And Prep
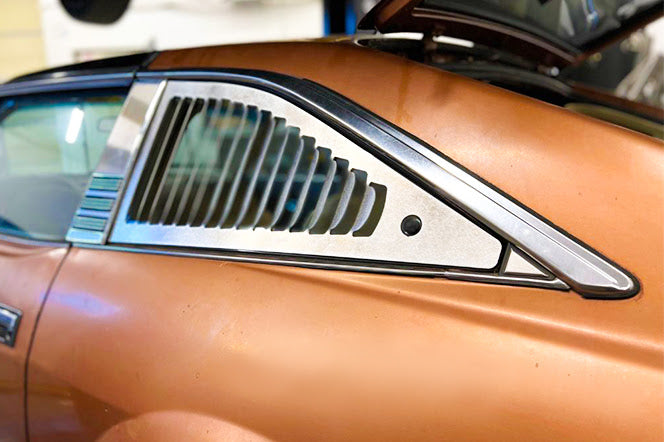
You'll want to get that aluminum off your Z car before you start polishing anything. The door frames, window channels, and those delicate drip rails have metal that needs some gentle handling. You'll find that most of the pieces are attached with small clips or screws hiding under the weatherstripping.
Don't rush the removal process. The trim pieces that got bent back in 1971 aren't too excited to straighten out now in 2023. I learned this the hard way when I hurried through my hood trim removal and ended up with a wavy mess. We've all been there. A bit of patience matters here for you.

Pick up some plastic trim tools at your local parts store. They're cheaper than the paint touch-up you'll need if you use the metal screwdrivers. Try wrapping some electrical tape around your tools for added protection when you're working close to the painted areas. Make sure that you also take some photos of everything before you start. Your memory probably isn't as reliable as you think. Snap pictures that show how each piece sits and where the fasteners go.
The trim pieces have an adhesive backing that has literally been baking in the sun for decades. Heat works wonders. Use a hair dryer to warm up the surrounding metal and soften the adhesive enough to let it go. After that, just run some fishing line behind the trim to cut through the sticky residue.
Put each piece in its own labeled bag. Write down some notes about where they came from originally. You'll thank yourself later when it's time to put everything back together again.
Gentle Cleaning That Protects Your Finish
Your Datsun Z's aluminum trim quite naturally loses its shine after sitting in the sun for decades. You'll need to clean it without scratching the soft metal. Let me share a good cleaning strategy that works for Z owners.
You should have a brass brush and some plain water to just get rid of the grime. Never use any steel wool on your aluminum trim. It's just too harsh and will leave permanent marks in the metal. You're trying to protect what you have left, not damage it more.

If your trim has any oily buildup or stubborn dirt, you can try a mild degreaser to break down the gunk. Just apply a small amount with a soft cloth before you start brushing. Think of this part as putting together your canvas before the painting - it makes the main work much easier for you.
When you brush the aluminum, you should always go in the same direction as the factory grain. When you go against it, this creates scratch patterns that won't match the original finish - this small detail makes a giant difference in how your trim looks when you're done.
The brushing process gives you a black oxidation sludge that you'll now need to rinse away completely. It's messy work. If you skip this part, that residue just dries up and makes your trim look worse than when you started. You should give it a great rinse with some clean water.
You should stay away from any household cleaners with harsh chemicals. Products like oven cleaner or drain opener will etch your metal surface. Once that happens, you can't fix it. Your Z deserves much better care than that.
For a final touch, you might want to try some products made specifically for aluminum. This finishing step can make your vintage Z look years younger.
Products And Application Methods
Now that you have gotten rid of the oxidation, you'll need to polish your aluminum trim.
You can buy these polishes as a paste or a liquid. The paste version lasts a bit longer. But you'll need to put in more elbow grease when you use it.
Make sure that you have some microfiber towels ready before you even start the polishing. They work great for this job because they won't leave any scratches on the soft aluminum. If you don't have any handy, cotton pads can work in a pinch, too. I had to learn through my own experience that light passes are the way to go with the polish. Your arms will feel it tomorrow. My friend from Z Club tried rushing once, and he pressed too hard - he ended up with uneven "hot places" that took forever to fix. Make a few gentle passes instead, and you'll get much better results.

You can also try attaching a foam cone to your drill. Just keep the speed low so the metal doesn't get too hot. The aluminum warms up pretty fast during the polishing process.
Remember to put some masking tape on the surfaces around your trim. The paint on these '70s cars isn't very tough, and the polish can leave some permanent stains. Even a thin strip of tape helps create a clean edge and saves you from having to do touch-ups later.
The weather matters quite a bit when you try to polish the aluminum. Try to choose a mild day for this job. When it's too cold, the polish gets stiff and hard to spread around. On hot days, it dries so fast before you can buff it. Make sure that you rotate your towel - this stops the old polish residue from scratching your freshly polished trim. Look at your work from different angles and in lighting to catch any places you might have missed. The results are worth every minute.
Use Power Tools for Better Results
When you're ready to restore those long aluminum trim pieces on your Z car, you'll quickly find that the hand polishing just doesn't cut it. Your fingers will thank you. Power tools can turn this job from a weekend-long punishment into something you can manage without losing your mind.
You'll want a variable-speed buffer for this job. The ability to control the speed matters because you don't want to damage the soft aluminum trim. Most of the Datsun fans out there recommend keeping it under 2000 RPM so you don't build up too much heat.
The accessories you choose matter just as much as the tool itself. The soft cotton wheels usually work great for your first round of polishing. You can try those mushroom-shaped buffs when you need to follow the contours and reach behind the emblems and other tough places.

Make sure to tape off any of the painted surfaces nearby before you start working - this thing gets pretty messy fast. The aluminum polish tends to stain the paint, and a spinning buffer will touch whatever's in its path. I found this out the hard way after I ruined a perfectly good fender on my 240Z project.
You'll need to watch out for the heat when working with aluminum trim. The metal conducts the heat fast and can warp if you stay in one spot for too long. You should move your buffer in steady passes across the surface to avoid this problem.
Be extra careful around the edges and corners. These areas get thinner during manufacturing and can burn through in seconds if you push too hard. Lots of the Z owners even learn this lesson the expensive way and end up having to shop for replacement trim.
For the best results, you can use the rouge bars made specifically for aluminum. Just apply a small amount to your buffing wheel and then let the tool manage the work. If you push harder, it won't make the job go faster - it just creates more heat and problems. Why risk damaging your trim when patience gives better results?
Severe Pitting Or Damage
Been there myself. When you polish, it won't always fix everything on your aluminum trim. When you have those deep gouges and those white places from corrosion, then you'll need to put in a bit more work to make them go away. Let's talk about what you can do next.
Progressive sanding works for smoothing out the deeper damage on your trim. You should have some 800 grit sandpaper and slowly move as high as 2000 grit if you want that mirror finish, and each step needs your patience - going too fast between grits just leaves you with scratches that become hard to polish away afterward.

You're still able to manage small nicks and divots with aluminum fillers that you'll find at most auto parts stores. The sense of achievement is worth it. These usually cost between $15 and $20 per tube, which saves you quite a bit compared to other options. Apply the filler, give it some time to cure, and then sand and polish until it matches the surrounding area. At what point should you stop trying to repair and just look for a replacement? This tends to be a tough choice for most people.
There's just something about how we value the original pieces that makes us want to save them. What about that hatch molding with the hail dents - does it also seem worth your time and effort to fix it? In some cases, reproduction pieces from specialty suppliers might make more sense. These usually cost between $75 and $200, depending on which trim piece you need.
Your aluminum trim might still be structurally good even with the existing damage, and in that case, professional anodizing has another answer for you. Most shops will charge you $100 to $150 for each piece, and you'll usually wait about two weeks to get it back. The pros just do it better.
Trim And Preventing Future Oxidation
Now that your aluminum trim looks good, it's time to put everything back where it belongs. You should line up each piece before you press it into position. Make sure that the clips snap in without forcing them too much. You don't want to bend anything after the work you've put in. I've broken clips this way. Take your time with this part - rushing might undo your hard work.
Check that the gaps between panels are even all the way around. You may need to loosen and realign a piece to get it just right. It'll bug you forever otherwise. If this takes a while, one time I spent over an hour changing my rear window trim until it looked factory-perfect. Your patience will pay off when everything lines up nicely.
Maybe replace the rubber seals while everything is apart. The new seals look better and keep water out where it belongs. Plus, it's much easier to do this job now than to take everything apart again six months later.

A small dab of anti-seize compound on those hidden screws will save you from future problems - this thing works like magic on aluminum hardware that tends to seize up after a few years.
Protect your freshly restored trim after putting in this effort. A good synthetic wax gives you a protective barrier against the sun, rain, and road grime. For longer-term results, try ceramic spray coatings - they cost a bit more, but keep your trim looking great for months. Apply them according to the directions for the best results.
I've even watched well-restored trim lose its luster in just a few months without care. You can stay away from this fate with minimal effort - a quick wipe with detailer spray every few washes keeps everything looking fresh. Make this part of your standard cleaning schedule, and your trim will stay looking great much longer.
Where you live makes a giant difference in how you need to care for your trim. If you're a coastal Z owner, you might have more corrosion danger than your friends in the dry areas. The salt air always attacks aluminum, so you might need to clean and protect it more. Take note of how your trim looks after the weather changes and adjust your maintenance schedule accordingly.
Build Your Dream Car
When you just take your time to remove each piece, it'll teach you how the small steps can create big changes - this thing takes time. You'll get a more authentic look when you manage your trim and tools with some patience instead of rushing through the entire process. When you do something as easy as hand-wiping the small scratches, it brings your whole car to life. I've seen that these easy steps give you the most satisfying results for your effort.
You don't need another rushed guide that tells you what to do without any explanation. The real satisfaction comes from when you can learn about the important job behind each step you take. When you rub in a fine polish, it might feel like an easy task to you. But when you pick the right product and work at a steady pace, it helps with the metal's authentic appearance. A medium-strength polish performs quite differently than an overly strong paste on your car. Also, a soft cloth tends to be safer than a machine that's not used.
Do you see how the right technique makes the difference? With this in mind, you should take care with the removal process. You can clean gently with the right materials. You should choose a good polish for your car. You can use some power tools and apply preventative care to restore your trim to like-new condition. You'll know that all your hard work was worthwhile when the sunlight catches that freshly restored edge.

If you're working on a 240Z, 260Z, 280Z, or any classic Datsun, we at Skillard can make custom bumpers for you. We also offer aluminum door cards, center consoles, spoilers, and other parts for your vehicle. Our specialty pieces will fit your project well, and they improve the style and performance of your car. Please check us out at Skillard.com to browse our catalog and find what you might need for your project. Your beautiful Z can turn heads again - will you let it be its best? You can share your photos and tips in the comments or join the conversation on our forum.