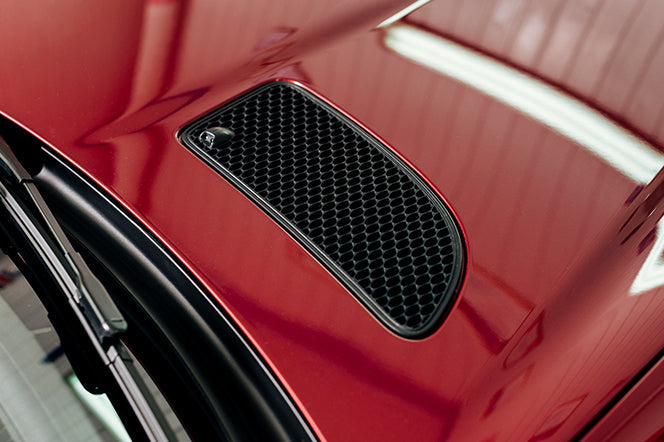
Are you thinking about adding a touch of style to your car while also boosting its performance? Universal hood vents are a great option. It's one of the few aesthetic upgrades that also has some impressive performance benefits.
But cutting into your car's hood can be a bit scary and nerve-wracking for first-timers. It's not exactly reversible if you measure wrong or if you slip your hand. It's important to have the right tools and a steady hand, and it also helps avoid any expensive mistakes.
If you're a seasoned professional in car modding or just starting to get into this hobby, this article is definitely for you.
I'll help you pick out the best tools and show you how to make sure your new hood vents fit just right!
Note: We just launched our brand new universal hood vent kit! You can check it out here.
Disclaimer: This article is authored by a member of the Skillard community and reflects their personal views, not necessarily those of Skillard. We welcome your feedback and corrections in the comments to help us continually improve this content.
Table of Contents
Do: Choose the Right Tools for Cutting
The goal is to make clean and precise cuts without messing up the hood or the paint around it.
It helps to start off with the right equipment. For slicing through steel hood parts, you could use something like a Dremel with a steel cutoff wheel - or if it's fiberglass, you can use a diamond-tipped cutoff wheel. It makes clean cuts and gives me great control, which is perfect for straight lines. Make sure the cutoff wheel is new and sharp, and make sure not to over-cut your lines.

The downside is that it can kick up a lot of sparks and can overheat the metal - so it only works well with a careful and experienced hand. Sparks aren't an issue with fiberglass, but airborne particles are, so you'll want to wear a respirator so you're not inhaling those. Any sort of airborne particles from fiberglass, metals, or chemicals from your paint can irritate your lungs and eyes.
When I'm working on more delicate areas or where finer cuts are needed, I try to use an X-Acto knife. It's perfect for scoring lines in the paint before making cuts, and it gives you a great visual guide.

I also use painter's tape when I first start laying measurements. It's an easy addition but really helps to manage the heat. It can also help you get your lines right before scoring them with the X-acto blade. And, you can draw on it, like measurements or arrows for directions. With that said, don't forget a measuring tape to keep your cuts perfectly even on both sides - and measure twice!

Safety has to come first, too, especially with cutting tools. I always gear up with safety glasses (or anti-fog safety goggles to be extra safe), gloves, and hearing protection, and I keep a fire extinguisher close by when working with steel. Also - keeping a clean and well-ventilated workspace is smart to avoid any mishaps. If you're cutting fiberglass, again, remember to wear a respirator.
Don't: Rush Through Measuring
When it comes to installing universal hood vents, getting a professional finish really depends on how good your first cuts are. Let me walk you through my usual strategy.
First, like we just talked about, picking the right tools for marking is a good idea. Some like to start with a centering wheel to find the starting and ending points. Others like to use a machinist square or a solid 2-piece trammel set to draw perfectly straight lines. Tools like micrometers and square sets are really useful for nailing that accuracy, too. At it's simplest, though, you can use a tape measure and carefully mark where you're going to cut.
In the measuring and marking stage, you should really take your time. I like a combination square and a marking blade because they make sure the measurements are both precise and easy to see. For drawing straight lines, nothing tops a dependable machinist square or straightedge, except perhaps a laser machine, but that's not necessarily the easiest option here.

Again, always, always double-check your measurements. It's so easy to slip up, and it's way easier to measure again instead of having to fix a crooked vent later. I always verify the fit with my initial design specs at least twice. This precaution helps stop misalignment - saving you the headache of wasting parts and doing extra work.
From what I've seen, skimping on preparation can lead to major issues. If your markings are off, can the vents end up looking uneven but they might not work right either. Any misalignment could mean redoing everything - leading to more waste and extra costs. And in the worst-case scenario, a bad cut could mess up the hood's structural integrity, posing a serious safety risk while driving.
Do: Decide The Direction and Angle of Your Cut
A smart trick is to kick off your cut from the underside of the hood. This strategy takes benefit of the hood's natural curves and lines, which helps it work for you rather than against you. This method protects the paint job - which we all know is meaningful if you love a spotless car exterior - but it also improves your control and patience during the cut.
Let me walk you through how I usually handle this. First off, I always make sure the hood is open and securely propped up. The last thing you want is for it to wiggle or, even worse, slam shut on you while you're busy working.
It might feel kinda odd at first - but you quickly get the hang of it. Or, you may want to remove the hood completely, if that's more comfortable and if you have a good spot to lay it down (or stand it up).

As a third option, some people place a tight sheet of plastic down over their engine bay (make sure the engine is completely cold!) so that the material falls on top of the plastic instead of on top of their engine, which makes cleanup easy later. Just be very sure of what's on the other side of your drill. I don't have to remind you what happens if a drill bit hits something important!
Next up, you should mark where you'll cut. I use a washable marker to outline the area right on the hood, sticking to its natural lines to make sure the vent blends well with the overall design. Then, score your measurements with your knife. No turning back now!

Picking the right tool is important when it's time to actually make the cut. Work slowly, take breaks between lines if needed, and stick to your measurements.
After making the cut, the final step is to smooth out any rough edges and pop the vent into place.

It's super satisfying to see everything come together and achieve a polished, professional look, especially when you cut from underneath!
Don't: Install The Vents In The Wrong Spot
If you're trying to help with your car's performance by getting rid of excess heat, you need to think carefully about where to put these vents.
A lot of seasoned mechanics and car buffs recommend putting the vents just before the rubber seal where the cowl meets the hood. This spot helps blow out hot air and also helps keep your car stable by cutting down on lift, which can mess with your handling and speed if it's not kept in check. The idea is to let the natural airflow cool your engine and stop the front of the car from getting too hot after a spirited drive.

But putting them in the wrong place can do more harm than good. To give you an example, if vents are in a bad spot, they could actually mess with your car's airflow and cause lift or turbulence. Lift is especially bad since it reduces pressure on the tires, which can mess with your traction and stability. So, make sure they are facing the right way!
This goes to show how understanding different placements can spark ideas for balancing style and effectiveness in vent installations. So, always think about how each change will work with your car's design and mechanics.
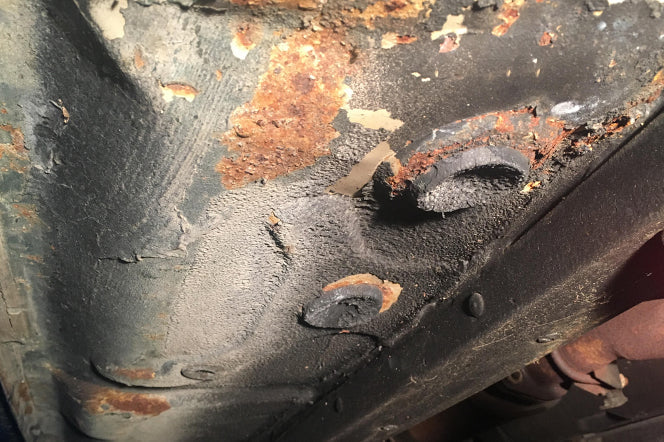
Do: Finish and Treat Edges to Prevent Rust
The first thing to do after cutting the sections out is to pay attention to the raw edges. In my experience, looking after these edges keeps your car looking sharp and also will make sure your modifications last a really long time.
After I've finished cutting, I usually get right to sanding down those edges. It's pretty tempting to skip this part, but smoothing out any burrs or rough places with fine-grit sandpaper is major. This little step really improves the final look - it also helps ward off rust later on.
Then, I treat the metal to shield it from corrosion. This is especially important if you live in a super humid area or where they salt the roads in winter. I start with a rust-preventative primer - after it dries, I apply some color-matching paint. This hides the modifications but adds extra protection, too. Some people like a clear sealant to keep the raw metal appearance while still protecting against rust. I think making sure all exposed areas are well-covered is important, no matter your style choice.
This doesn't have to be award winning autobody paint necessarily. It's hidden by your vent once installed; it's mostly to re-seal the metal you just cut so it's not exposed to the elements. You don't want it to become a rust spot.

If your hood is made of fiberglass, you have an easier job, as fiberglass doesn't rust. But you still want to make a clean cut. Even though you don't need rust treatments, I'd recommend sealing the edges with a protective clear coat to stop the fiberglass from fraying or chipping.
For both metal and fiberglass hoods, picking high-quality sealants and paints is a good idea. Products specifically made for automotive use like to hold up better against road conditions and weather, keeping your modifications looking sharp and professional for much longer.
Do: Think About the Structural Integrity
When you start thinking about adding a universal hood vent to your car, it's valuable to familiarize yourself with the layout of your hood. I've learned pretty a bit from messing around with my own car and doing tons of research on how to keep the hood in good shape.
First off - while it's really tempting to just grab a saw and start cutting - it's a good idea to plan your cuts carefully. The internal supports in the hood stretch from the front to the back of the car and play a big part in keeping it stable. It helps to look at diagrams or talk with an expert to find these supports and understand why they are so important to the hood's overall strength.

You really want to avoid cutting through these supports. Just imagine you're driving on the highway and your hood starts to shake wildly or - even worse - the fiberglass cracks. That's definitely something you'd want to steer clear of.
If you absolutely have to cut through an important support piece on a metal hood, make sure that you don't damage the welds. These joint points are important too as they connect the support structures, and damaging them can seriously weaken the hood. Some car buffs use specific tools and cutting techniques to reduce this damage, and taking this extra step is a good idea.
Remember, anyone making changes to a car's structure should respect its original design. The goal is to honor the existing engineering while making sure your modifications are safe and useful!
Don't: Rush the Cutting Process
When I first decided to install universal hood vents on my car, I quickly realized how important it was not to rush the cutting process. It's a good idea to make those cuts precise and clean because jagged edges or overheated metal can really mess up both the look and structure of your car.
I strategize the cutting process with as much care and patience as a surgeon would. I always measure everything at least twice before I start cutting. High-quality tools specifically designed for cutting metal are pretty valuable to me. I make sure my tools are well-maintained and up to the job. Equipment like a rotary cutter or a high-speed cutoff tool can definitely help you get those crisp, clean lines.
Breaking the project into manageable stages has been really helpful. To give you an idea, I will start by marking the cut on the hood with non-permanent markers. Next, I make a shallow initial cut to clearly outline the area. This is also a good point to double-check my measurements and make adjustments if needed before cutting deeper.
From my experience, taking your time and following these steps can lead to a beautiful and functional outcome. The vents fit perfectly and help with airflow, which is especially beneficial during high-performance driving situations.

A slow and steady strategy in the cutting process for installing hood vents will make sure that everything goes perfectly!
Do: Build Your Dream Car
If you're someone who really cares about keeping your car looking awesome, if it's a sleek sports cast or a vintage classic - paying attention to the little things like vents is a good idea. It totally makes sense to use high-quality parts that fit perfectly and also help make your car look even cooler, right?
This is where Skillard comes in - we get the thrill that drives car enthusiasts to take their vehicles to the next level. Plus, we have a fantastic universal hood vent kit that we just launched, precision-made from CNC-formed aluminum and powdercoated. You can check them out here!
Also, if you need specially-made parts for beloved classics like the Datsun 240Z, 260Z, and 280Z or you're on the hunt for universal hood vents that fit any vehicle - we have all you need to help with both the looks and performance of your car.

Are you thinking about starting a new project or need some help with your restoration efforts? Skillard is ready to set you up with the best parts out there.
Let us help you turn your vehicle into the dream ride you've always wanted!