Owners hit this exact point in a repair and find out the hard way that there's quite a bit more metal loss hiding underneath. Product options multiply fast once you're deeper into the project. It's also worth keeping in mind that even garage-kept examples can have corrosion that no one knew was there until the layers start coming off.
It takes quite a bit more time and effort than a rattle-can touch-up job. But the payoff is a repair that holds up for decades! A tail panel done right (one that actually matches the surrounding panels and has a primer seal underneath) changes how the entire rear end of a car looks. It's the type of job where the extra effort does show in the final result - it's especially true on a car as recognizable as the Datsun Z.
What follows covers the rust removal, panel decisions, primer options, color matching and the final paint application - and each one depends pretty heavily on how well the step before it was done.
Let's go through the refinishing of that Datsun Z rear tail panel together!
Table of Contents
Why Rust Always Finds the Rear Tail Panel
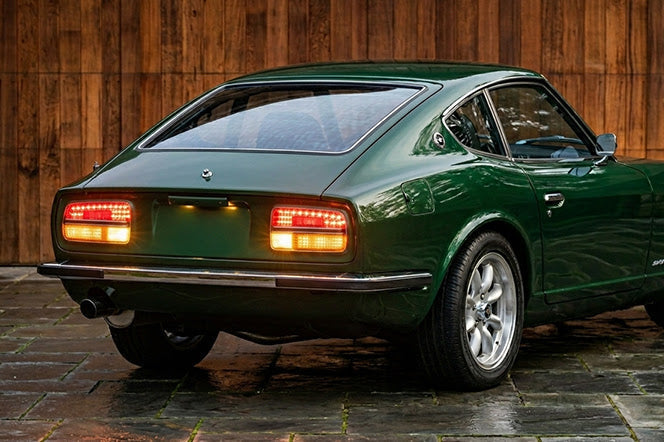
The rear tail panel on a Datsun Z is in a tough position because of the body shape itself. The contours push moisture toward the lower edges and seams, and once water gets there, it just sits instead of draining away.
From the factory, these panels came with the seam sealer already applied to protect those joints. The issue is that seam sealer from the 1970s was never built to last a lifetime - and after a few decades of wear, it starts to crack and pull away from the metal. Once that seal goes, water gets in, and it tends to just stay there.
Road debris and trapped dirt can only make the problem worse. Grit packs into the lower seams, sits there and holds the moisture pressed right up against the metal - it's what rust needs to get started. Nissan's factory corrosion protection was also pretty thin by modern standards, so the bare steel never had much protection from the elements.

Even a well-stored Z with a long history of careful owners can still show rust in this exact area - it's worth keeping in mind. From what I've seen, it's less about how the car was treated and more about how the panel itself was designed. Rust on a car usually means some neglect (and with cars, that's a fair enough assumption), but on these panels specifically, it's just a matter of time. If your car has this problem, that's not on you.
From here, we'll get into what actually makes one option better than the other (a basic repair versus a full panel replacement) and how to work out which one is the right move for your situation.
Should You Repair or Replace the Panel
First, get your hands on the panel and actually feel what you're working with. A visual inspection will only get you so far - run your palm across the tail section and press hard into any area that looks thin or bubbled.
From there, the main question is whether the panel is even worth saving. Light surface rust with metal underneath is a great candidate for restoration - it's very workable. A panel that flexes, crumbles or feels paper-thin under pressure is different, though - it changes the picture quite a bit.

Before going too far down either road, it's worth keeping in mind that reproduction rear tail panels are available for Datsun Z cars - and they can save a lot of time. A repro panel arrives ready to fit and finish, which means that you can skip a portion of the harder restoration work. For the right build, it's a perfectly valid way to go.
That said, not everyone is ready to swap out the original sheetmetal - it's fair. A car that stays as close to factory as possible means something - even when it takes more time and money to get right. It's a personal call, and either path can make plenty of sense depending on what the build needs.
Whatever path you take, go in with a sense of what you're up against. Rust tends to go much deeper under the surface than it looks, which alone can drive restoration costs up quickly. Repro panels will cut most of that uncertainty out of the equation, though die-hard purists will feel that trade-off. Once you've made the call on whether to save the original metal or swap it out, the next step is pulling the panel off the car.
Remove the Tail Panel with Care
Once you've made the call on repair versus replacement, it's time to pull the tail panel free from the rest of the car. With the panel off, you'll have access to every surface on it, and you'll also cut way down on the amount of masking that you'd otherwise have to do.
Remove the bolts along the lower edge and at each corner where the panel meets the quarter panels - most of them will come out without a fight. Anything that's been sitting for a few decades deserves a little more patience, though - a soak of penetrating oil before you touch it with a wrench will save you plenty of grief. The toughest stretch of the job is up at the top edge, at the welds or bonded seams where the panel ties into the trunk floor and the rest of the surrounding body structure.

That's also where plenty of home builds start to fall apart. Brittle metal won't tolerate force, so take your time and reach for a seam splitter or weld drill instead of a pry bar. If a section won't budge, then give it some more penetrating oil and let it sit for a bit - patience does win here, and it almost never ends well if you rush it.
Once the panel is off, all that patience from earlier more than pays off. A removed panel is way easier to sand, treat and prime than one that's still bolted to the car with tape wrapped around everything. A home garage works just fine for this, and plenty of Z owners manage it the same way. A clean removal sets you up well for the rust treatment and the surface prep that comes next.
Get the Metal Clean Before You Prime
Once the panel is off the car, the work can finally start. The whole goal at this stage is to get down to clean bare metal - and it's worth the effort, because everything else that follows gets built on top of it.
A few different methods will get you there. Chemical strippers work well on flat sections and are pretty easy to control. A media blaster is a bit faster and can reach corners that are hard to get to by hand. For smaller areas or touch-up work, 80-grit sandpaper by hand does the job just fine. Whichever way you go, how you get there matters a bit less compared to what you come away with - clean bare metal with no paint, filler or scale left behind.

Rust deserves its own conversation. Light surface rust can be treated with a rust converter - it bonds directly with the oxidized metal and leaves you with a stable base to prime over. Heavy rust and deep pitting are a whole different situation - that metal needs to come off completely. A fresh finish over damaged metal is one of the most common regrets mentioned on Z restoration forums, and it'll show up pretty fast under the lights at a car show.
Once you're ready to move on, give the entire panel a careful pass with your fingers and hold it up against a light source at a low angle. Pinholes and thin places can hide from you, and they will show up through primer and paint. Mark them and take care of them now. The next section on primer options will make more sense once you're confident that your metal is in decent shape.
Epoxy is the Right Primer for Metal
With a car this old, epoxy primer is the only product worth putting on bare metal - full stop. It bonds directly to the surface and lays down a protective barrier underneath your paint that actively pushes back against moisture and corrosion.
A quick word on why epoxy is the better base coat option. Self-etching primer uses acid to bite into the metal - and while that creates strong adhesion, it just doesn't hold up as a foundation for topcoats in the way epoxy does. High-build primer is a different story - it works great for filling in small surface imperfections. Just know that it needs to go on an epoxy layer first - not straight onto bare metal.

A bad primer choice at this stage is probably one of the most repeated mistakes in Datsun Z restorations, and I see it quite a bit. Mid-project, when something on the shelf looks close enough, it's tempting to just go with it.
For the tail panel, two coats of epoxy primer are the right call. Let the first coat flash off all the way, then put down the second one and give everything enough time to cure before you move forward. Dry times can swing quite a bit from brand to brand, so a quick check of the product label is always worth it. Once that epoxy is cured, the panel will be in great shape and ready for color matching.
Find the Right Color for Your Z
With the primer down, color is the next big challenge.
Classic Z colors have had decades to fade, and the paint on your surrounding panels has aged in ways that are nearly impossible to predict - it might look fine in the garage. But once you're standing in direct sunlight, those color changes are going to start drawing some attention. At a Z meetup (where other enthusiasts will walk right up and get within inches of your paint), a color mismatch like that has nowhere to go.
Your factory paint code is the best place to start, and on most vehicles, it's printed right on the firewall tag. A decent paint shop will want to see it up front - it gives them a foundation to work from before anything else. From there, you can ask them to run a spectrophotometer reading on one of your original panels.

It does take a bit of extra time and money - but it's the only reliable way to come away with a result that actually fits with the paint around it. A shop with experience in classic car restorations will already know what you're after once you describe it. Not every shop has a spectrophotometer on hand, so it's worth making a few calls before settling on anyone.
One of the more common mistakes I see in otherwise decent restoration work is to skip that step and go right to the color. Before the tail panel ever sees any paint, the formula needs to be mixed, matched and ready to go. The next section gets into how to lay that color down and then covers the clearcoat process that goes on top of it.
How to Use Paint and Clear Coat
Once your color is matched and your panel is ready to go, it's time to put paint to the metal. From this point on, the job moves fast, so make sure that your spray gun is dialed in before you start on that panel.
Set your gun to a medium fan width with a moderate fluid flow and stick with thin coats instead of one heavy pass. A heavy coat is about the fastest way to get runs, and runs on a tail panel are a headache to sort out once the paint starts to set.
Between each coat, you want to let the finish flash off before the next one goes on. Flash time is the window between coats - it gives the solvents time to escape before more material goes on top of it. Painters rush right through it - it's one of the most common reasons a finish ends up with an orange peel texture or solvent bubbles trapped under the clearcoat.

If it's your first time spraying a full panel, do yourself a favor and run a practice pass on some scrap metal ahead of time. It's a low-pressure way to dial in your gun settings and find a comfortable pace - all before anything that matters is actually on the line.
Dust is another problem to watch for. Even a little bit of airborne debris can settle into wet paint and leave little bumps that are nearly impossible to sand out without wrecking the surrounding finish. Do your best to set up in the cleanest area that you have available and give the panel a quick wipe-down with a tack cloth before any paint goes on - it only takes a second, and it goes a long way.
Once your base coats are down, apply your clearcoat with that same patient technique. The clearcoat is what gives your finish its depth and long-term durability, so don't rush it - it deserves the same care and attention that you put into your color coats.
Build Your Dream Car
Once the clearcoat is down and cured, the worst is behind you. A light wet sand with 2000-grit paper and a machine polish will pull out a depth and a gloss that make the whole rear end look like a new car. From there, the panel goes back on, and you finally get to step back and take in what you actually built.
There's something legitimately satisfying about this work - and to be honest, the rear tail panel is one of the most visible parts of the car, so when it's done right, the whole back end just looks changed. A panel that's been sealed and prepped right will also hold up for years in a way that a quick rattle-can fix never could. The job was done right, and the car will show that for a long time.

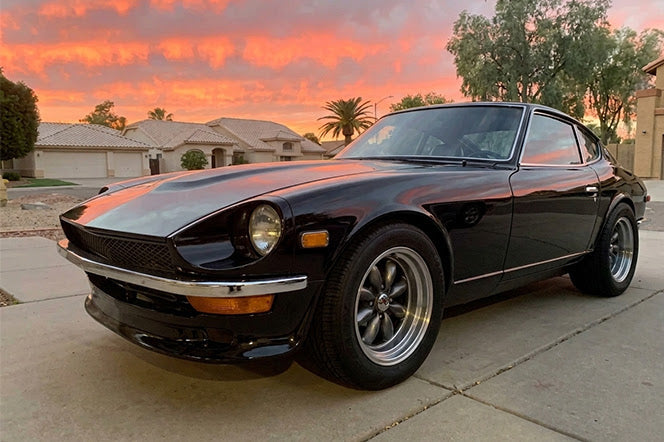
A fresh tail panel is a reminder of just how much these cars still have left to give. The 240Z, 260Z and 280Z all reward the patient work that makes a build feel personal - and there's no shortage of directions to take it from there. We built Skillard around that exact passion, and the catalog at Skillard.com backs it up. From bumpers and spoilers to aluminum door cards and center consoles, every part in our catalog is made with Datsun Zs in mind and for nothing else. No matter where your build is headed, check us out at Skillard.com and see what's out there for your Z.